

Setting Connect preferences: General
The General section in Connect Preferences provides you with a quick overview of your RB Connect subscription. You can view your licensing information and RB Connect plug-ins, plus manage contact/resource BU access.
Step-by-step instructions
- Click Connect > Connect Preferences.
- On the left-hand side, click General.
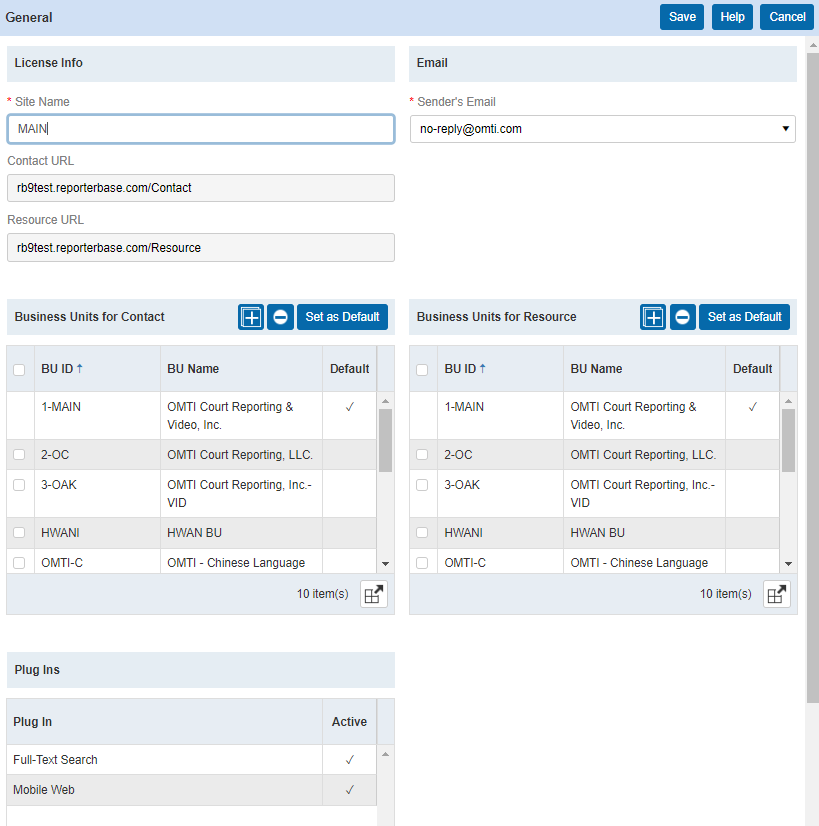
- On the right in the General panel, the first section you will see is License Info. This section contains the URLs that you can provide your clients for accessing their RB Connect login page. Data in this section is fixed and cannot be edited.
- In the Email section, select the desired default send from email address when clients or resources click Forgot Password, when payment receipts are sent after online payment is submitted, a job is scheduled, a cancelation is requested, etc.
- In the Business Units for Contact section, manage which BUs are accessible to contacts.
All jobs must have an associated Business Unit for billing and reporting purposes. If you do not want your main BU defaulted for all new job requests coming from RB Connect, you may wish to set up a BU purely to funnel all the new requests into one place. This way, when you formally schedule the job on your Calendar, you can then select the appropriate BU to assign to the job.
It is important to note that when a new BU is created, you should add it to this list, because clients can only view jobs for BUs listed on this panel. If jobs are scheduled under BUs not on this list, clients will be unable to access them from their RB Connect Calendar, even if they are the Ordering Client.
- To make changes to this list, click Edit at the top right of the General panel.
- You will notice that this section now has three button options:
- Add – To add new BUs to this list, click
 . Any BUs in the system that are not yet on the Contact list appear in the Add Business Units panel. Check the box next to any BU(s) you want to add and click Save.
 - Remove – If you no longer want your ordering clients to have access to certain BUs, simply check the boxes next to the desired BU(s) and click
 .
. - Set as Default – Use this option to designate which BU is the default for your clients. Click Set as Default, then click the desired default BU to select it. The new default will be checked in the Default column in the Business Units for Contact list.
- Add – To add new BUs to this list, click
- In the Business Units for Resource section, manage which BUs are accessible to resources.
Like the Business Units for Contact panel, it is equally as important to ensure that your Resources are given access to the appropriate BUs when you assign jobs. If jobs are scheduled under BUs not on this list, the resource will not be able to view them when they are assigned a new job to complete. With this in mind, when a new BU is created for your organization, be sure to check back to this panel and add the new BU.
- To make changes to this list, click Edit at the top right of the General panel.
- You will notice that this section now has three button options:
- Add – To add new BUs to this list, click . Any BUs in the system that are not yet on the Resource list appear in the Add Business Units panel. Check the box next to any BU(s) you want to add and click Save.
- Remove – If you no longer want your resources to have access to certain BUs, simply check the boxes next to the desired BU(s) and click .
- Set as Default – Use this option to designate which BU is the default for your resources. Click Set as Default, then click the desired default BU to select it. The new default will be checked in the Default column in the Business Units for Resource list.
- Add – To add new BUs to this list, click
The next section, Plug Ins, lists any optional plug-ins that you have active subscriptions to. Data in this section is fixed and cannot be edited.
NOTE: The only plug-ins currently offered for RB9 that work with RB Connect are Full-Text Search and Connect Mobile.
- Click Save at the top right of the General panel to save your changes.