

Setting system preferences > Calendar
Set default preferences for RB Calendar-related functions. Since Calendar is one of the most important modules in RB, it’s not surprising that this is the section with the most preferences to set.
Step-by-step instructions
In Setup > System Preferences, click Calendar.
-
Click Assignment Cancellation to set preferences for communications you send to resources when they’re assigned to a job that cancels on the calendar. If a client lets you know that a job is cancelled, you cancel it in RB. Upon cancelling the job, RB will ask if you want to send an Assignment Cancellation to the assigned resource. If you click Yes, communications using these preferences will be sent. You can notify resources of cancellations using print, email, and text messaging.
NOTE: The actual Assignment Cancellation form that is sent with emails to resources comes from the Form Templates function in Tools (see Customizing Form Templates). This section is for customizing the associated communications.
Click Edit to set your preferences. The top portion is for customizing the Assignment Cancellation email. The recommended Send Method is “Embed as email body and attach as PDF.” That way the email’s body will contain the actual cancellation form. And if the resource needs a printable copy, they have the same form attached as a PDF.
The drop-down arrow (
 ) in the Email Subject and Email Message panes display a list of all the available merge fields you can add to these parts of your email. Adding a merge field will allow real data from the job to merge into the email, so you don’t have enter any information as you send these. RB will merge the data from the job automatically.
In the SMS section below the email, set up an Assignment Cancellation SMS (text message) by customizing the SMS Subject and SMS Message. The fields have the same drop-down arrow (
), so you can insert merge fields. Click Save.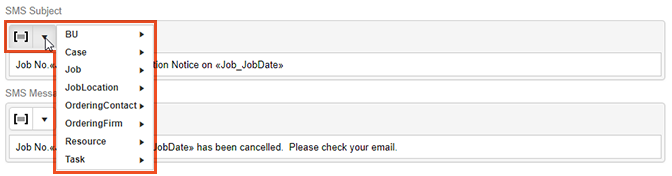
IMPORTANT: Essential fields to include in Assignment Notifications/Cancellations
If you use different times for tasks from job times, edit your Assignment Notification/Cancellation emails and SMS messages, and Assignment Notification iCalendar files, to use task time data fields. Add:
- Task > StartTime
- Task > EndTime
Save space in text messages by removing job time data fields. And be sure to add task time data fields to your Assignment Notifications/Cancellation form templates.
Click Assignment Notification to set up the communications you send to notify your resources when they have a job they are assigned to. Typically, after you confirm your calendar for tomorrow’s jobs, you will email assignment worksheets to assigned resources for tomorrow’s jobs.
NOTE: The actual Assignment Notification form that is sent with emails to resources comes from the Form Templates function in Tools (see Customizing Form Templates). This section is for customizing the associated communications.
Click Edit to set your preferences. The top portion is for customizing the Assignment Notification email. The recommended Send Method is “Embed as email body and attach as PDF.” That way the email’s body will contain the actual assignment notification form. And if the resource needs a printable copy, they have the same form attached as a PDF.
The drop-down arrow (
) in the Email Subject and Email Message panes display a list of all the available merge fields you can add to these parts of your email. Adding a merge field will allow real data from the job to merge into the email, so you don’t have enter any information as you send these. RB will merge the data from the job automatically.
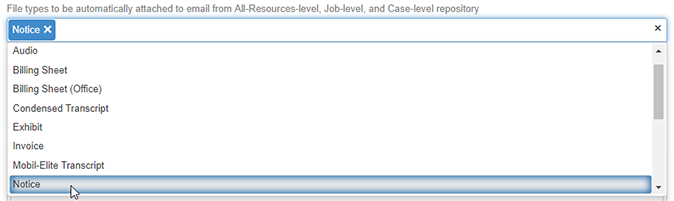
Below the email fields, click in File types to be automatically attached to email from All-Resources-level, Job-level, and Case-level repository and select from the drop-down file types, that if uploaded to one of those repository levels, will automatically attach to the Assignment Notification emails. This is a great tool because it allows you to send one communication email to your assigned resources, that can include multiple attached job files that they will need for their job.
One example of this would be the “Notice” file type. It’s always important that if you receive the notice from a client, you forward that file to the assigned resource. With Notice set in this field, when you open a job and go to the repository section to upload a file, choose File Type > Notice for the file, and that file will automatically attach to the Assignment Notification email.
In the SMS section, set up an Assignment Notification SMS (text message) by customizing the SMS Subject and SMS Message. The fields have the same drop-down arrow (
), so you can insert merge fields.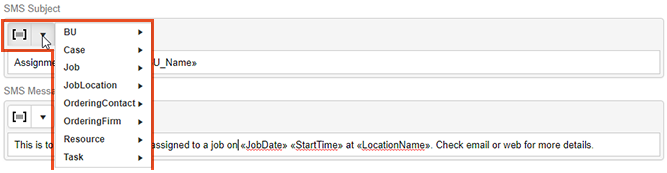
-
Below the SMS section, are preferences for attaching an iCalendar file to the Assignment Notification email. If Attach iCalendar is set to Yes, RB will attach an .ics file to the email. When the assigned resource opens the file, they can save the job setting to their personal calendar, including Outlook, Gmail, Calendar, or Yahoo. Click the drop-down arrow (
) to insert all the necessary merge fields into the iCalendar Subject and iCalendar Description fields, so the calendar setting will give the assigned resource as much job information as possible to pre-populate their calendar entry. Click Save.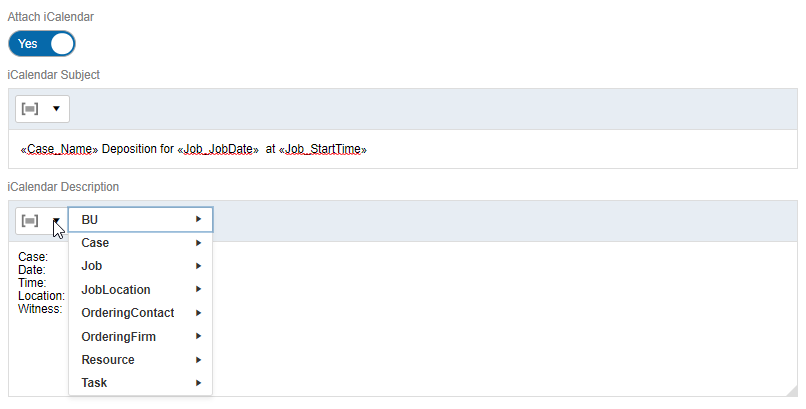
Click Default Job Status to see a list of all job statuses. Click Edit to choose which statuses will be checked by default in Jobs (List View), Jobs (Monthly View), and Weekly View. This default is for searching the job calendar. If you don’t care to see a particular status or statuses in the default search, simply uncheck the ones you don’t want to see, then click Save.

Click Future Calendar to set up the default email that is sent to clients when they request a copy of their calendar scheduled with you. Click Edit to set the Email Subject and Email Message, and click their drop-down arrows (
) to insert merge fields. Send Method is not editable. The actual Future Calendar report will attach to the email as a PDF. Click Save.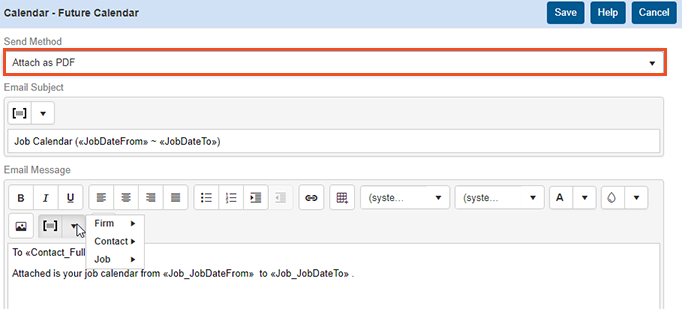
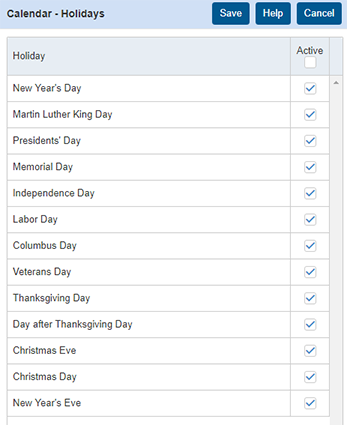
- Click Holidays to see a list of all the major holidays observed in the U.S. Click Edit, then check the holidays your office observes and closes for, so these days are not calculated in the due days for your reporters to turn in their jobs. Click Save.
Click Job Cancellation to set preferences for emails you send to clients confirming they cancelled a job on the calendar. If a client lets you know that a job is cancelled, you cancel it in RB. Upon cancelling the job, RB will ask if you want to send a Cancellation to the ordering client. If you click Yes, this is the email that will be sent.
NOTE: The actual Cancellation form that is sent with emails to clients comes from the Form Templates function. (Refer to Creating/updating forms & letters in the User Guide for information on changing the default form or creating a new form). This section is for customizing the associated email.
Click Edit to set your preferences. The top portion is for customizing the Cancellation email. The recommended Send Method is “Embed as email body and attach as PDF.” That way the email’s body will contain the actual cancellation form. And if the resource needs a printable copy, they have the same form attached as a PDF.
The drop-down arrow (
) in the Email Subject and Email Message panes display a list of all the available merge fields you can add to these parts of your email. Adding a merge field will allow real data from the job to merge into the email, so you don’t have enter any information as you send these. RB will merge the data from the job automatically. Click Save.
Click Job Confirmation to set preferences for emails you send to clients confirming their jobs. As a courtesy, maybe you email your clients the day a job is scheduled to confirm you indeed added the job to the calendar.
Or maybe it’s the day before the job, and you want to confirm tomorrow’s calendar via email. Email a confirmation letter for all of the next day’s jobs for each client to reply to you to confirm.
NOTE: The actual Job Confirmation form that is sent with emails to clients comes from the Form Templates function. (Refer to Creating/updating forms & letters in the User Guide for information on changing the default form or creating a new form). This section is for customizing the associated communications.
Click Edit to set your preferences. The top portion is for customizing the Job Confirmation email. The recommended Send Method is “Embed as email body and attach as PDF.” That way the email’s body will contain the actual confirmation form. And if the resource needs a printable copy, they have the same form attached as a PDF.
The drop-down arrow (
) in the Email Subject and Email Message panes display a list of all the available merge fields you can add to these parts of your email. Adding a merge field will allow real data from the job to merge into the email, so you don’t have enter any information as you send these. RB will merge the data from the job automatically. 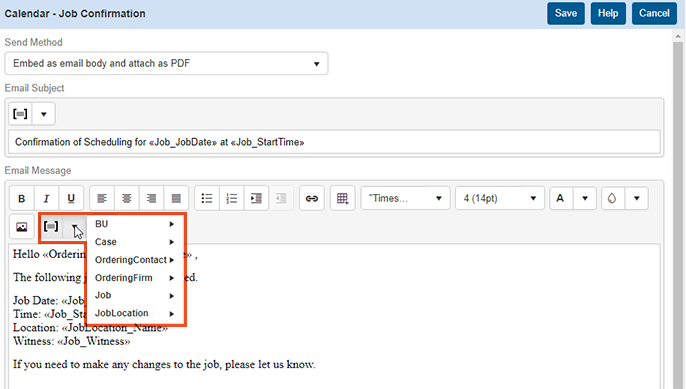
At the bottom of the Calendar – Job Confirmation panel are preferences for attaching an iCalendar file to the Job Confirmation email. If Attach iCalendar is checked, RB9 will attach an .ics file to the email. When the client opens the file, they can save the job setting to their personal calendar, including Outlook, Gmail, Calendar, or Yahoo. Click the drop-down arrow (
) to insert all the necessary merge fields into the iCalendar Subject and iCalendar Description fields, so the calendar setting will give the client as much job information as possible to pre-populate their calendar entry. Click Save.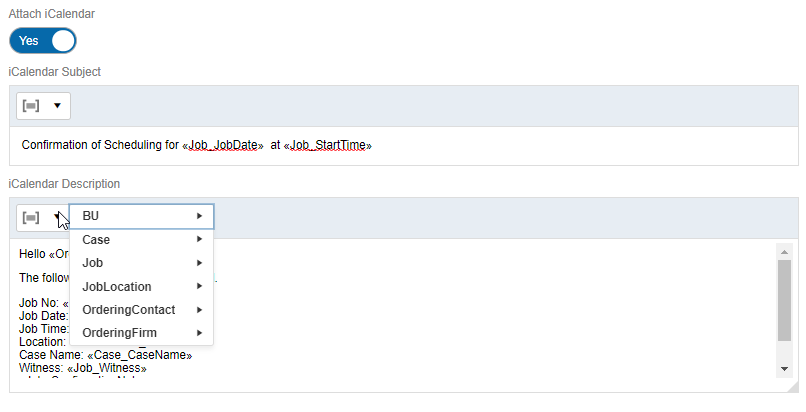
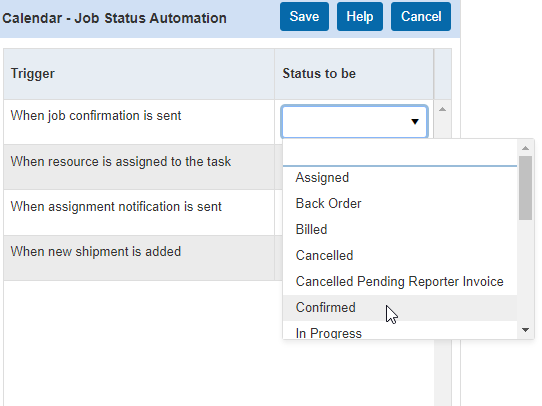
Click Job Status Automation, then Edit if you want to have RB automatically change job status for you at different milestones. For each trigger, such as when a job confirmation is sent, select the status the job will change to in the Status to Be dropdown. When finished, click Save.
Click Job Status Color, then Edit to choose a color for each job status in RB. The purpose of tying a color to a status, is so that at a quick glance, you’ll notice the color next to the job status and over time you’ll get used to which colors represent which status and you won’t have to read the job statuses. For example, over time I’ll recognize if red represents a cancelled job and won’t have to actually look to read the status. You have options for the default color settings as well if you use dark mode.
To change a default, click the
(drop-down arrow) to the right of the displayed color, then pick from the pre-defined colors or click  for more options. (For more information on picking colors, see Picking colors in RB9 in the User Guide.) When finished updating colors, click Save.
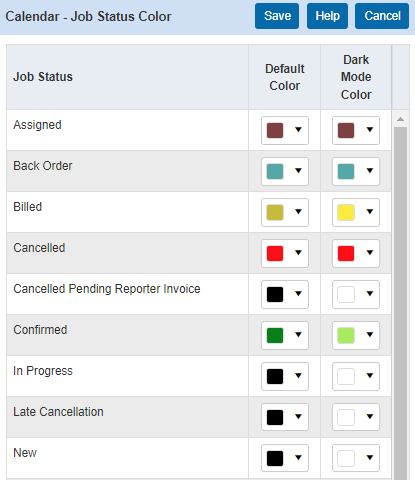
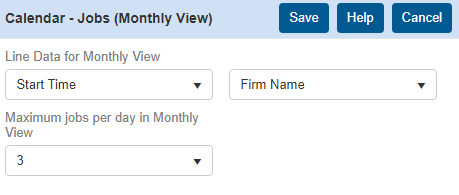
Click Jobs (Monthly View), then Edit to set some default monthly calendar display properties.
In viewing jobs on the monthly calendar, you see 2 pieces of job data. Select which types of job data are displayed in the 2 Line Data for Monthly View drop-downs. “Start Time” and “Firm Name” are good options to set.
In the Maximum jobs per day in Monthly View drop-down, you can select the maximum number of jobs to appear listed in each day’s box on the calendar. Three jobs displayed is the minimum, and 10 jobs is the maximum. If more jobs are scheduled for a day than the number selected here, they are included in the number in the bar at the bottom of the day’s box and accessible by clicking the bar. Click Save.
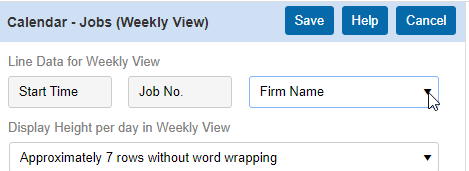
RB9 only: Click Jobs (Weekly View), then Edit to set some default weekly calendar display properties.
When viewing jobs in the weekly calendar, you see 3 pieces of job data. “Start Time” and “Job No.” are fixed, but you can select which type of job data is displayed in the third field by selecting one of the options in the drop-down.
In the Display Height per day in Weekly View drop-down, you can set the height of each weekday’s box on the calendar in rows. Each row can list one job.
If there are more jobs scheduled for a day than the maximum set here, the day’s space includes a scroll bar so you can access the jobs that are not visible at first. Click Save.
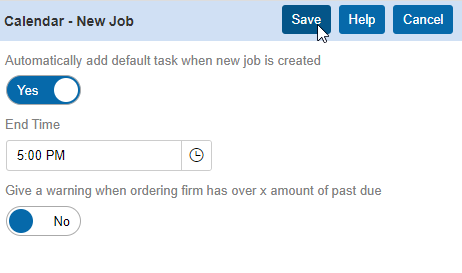
The New Job section has an option that’s set by default because it’s the recommended setting. If this option is set to Yes, every new job saved in RB will automatically include a task of your default task type. (Default task type is set in Lists.)
You can set a default end time for new jobs by entering or selecting a time in the End Time drop-down.
You can have RB display a warning when you are setting a new job for a client that is overdue on their payments to you. Set Give a warning when ordering firm has over X amount of past due to Yes, then enter a number in Past Due Days for the length of time a bill is overdue before the warning appears and the dollar amount in Past Due Amount that the client must be in arrears for before the warning appears. Click Save.
Click Overdue Tasks Report to set up the default email that is sent to resources with a report of tasks that are past their due date as a reminder they need to turn those jobs in.
Click Edit to set the Email Subject and Email Message, and click their drop-down arrows (
) to insert merge fields. Send Method is not editable. The actual Overdue Tasks Report will attach to the email as a PDF. Click Save. 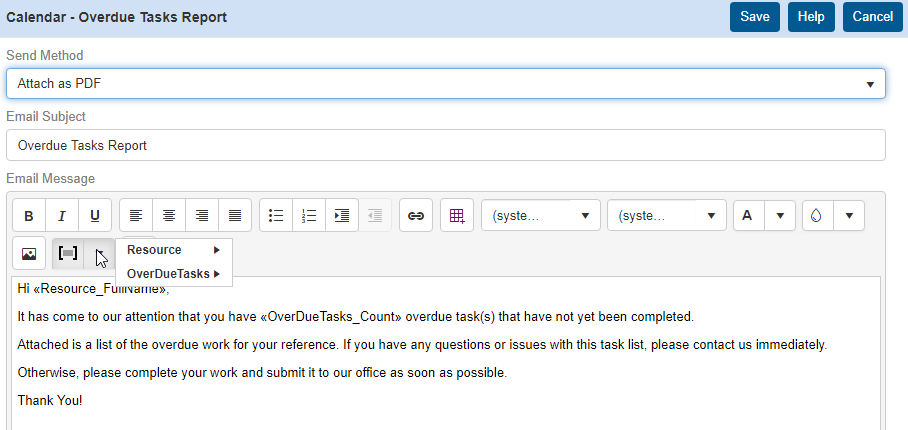
RB9 only: Click Resource Blast to set preferences for communications you send to available resources for a last-minute depo. If a client calls you in the AM and says they need a resource in 2 hours, without RB9 you would probably start emailing and SMS (text) messaging all your available resources to see who can cover the job. Using Resource Blast, you can send out a single blast email and/or blast SMS (text) message to a group of resources that you specify.
Click Edit. Enter text in the Email Subject and Email Message, and click their drop-down arrows (
) to insert merge fields.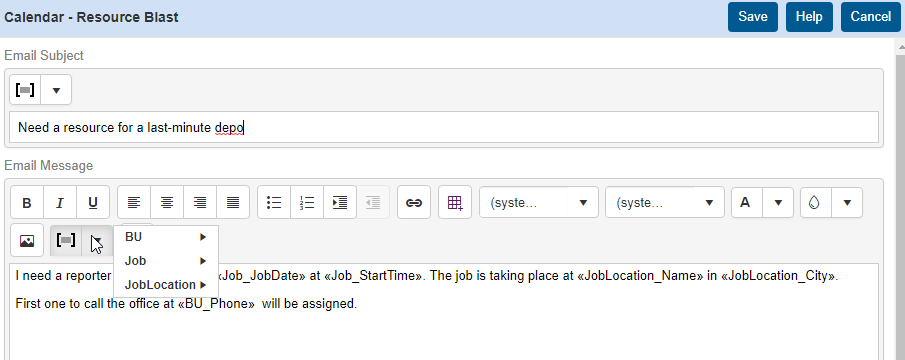
In the SMS section below the email, set up the SMS (text) message that is sent to the list of resources by customizing the SMS Subject and SMS Message. The fields have the same drop-down arrow (
), so you can insert merge fields. Click Save.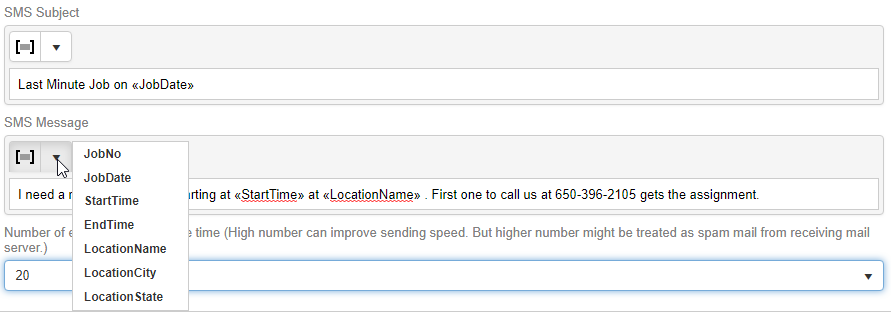
Click Tasks (Monthly View) to set the displayed line data when viewing your tasks in the monthly view. Each line of data will represent a single task, and you can set 2 pieces of viewed data by clicking the drop-down.
Click the Maximum tasks per day in Monthly View drop-down to set the maximum number of tasks to display in monthly view. If the total number of tasks for a day exceeds the maximum number of tasks, click the blue total line at the bottom of each day to see all tasks for that day.
.png)
Click Time Zone, then Edit to select which time zones appear in Time Zone drop-downs in RB. Users select which time zone is their personal default in User Preferences from the list you create here.
Click Zoom, then Edit to enter Zoom credentials and meeting preferences. Follow the instructions in the User Guide to generate the Client ID, Client Secret, and Account ID to enter here. Customize the Topic and Description for your Zoom meetings, including adding merge fields by clicking the drop-down arrow (
) above each field.Leave the other options at their default settings (read more about these options in the User Guide), and click Save.
