
Setting user preferences
User Preferences are individual settings each user account needs set up at least one time. The settings will follow the user wherever they log in. Users can update their personal settings anytime; preferences set here do not affect the system as a whole.
Step-by-step instructions
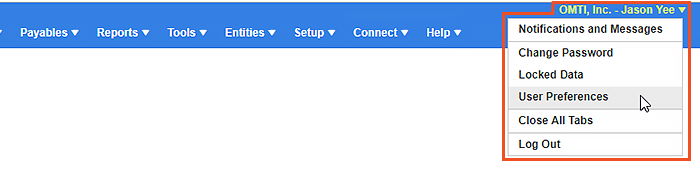
To begin, click your name at the top right, and select User Preferences.
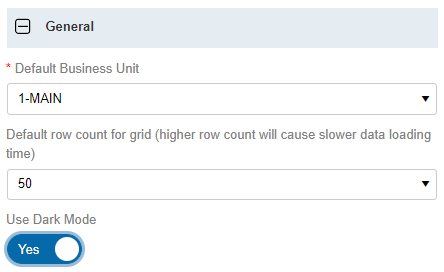
In the General section, set your Default Business Unit (required). This will be your default business unit (BU) when entering new jobs in the calendar.
You can also set Default row count for grid to the number of records to display in results grids before going to an additional page. You can select 20, 50, 75, or 100 records.
Set Use Dark Mode to Yes to have your screen display white on black when you are in RB.
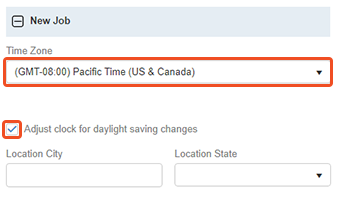
In the New Job section, select your Time Zone. This will set the time zone by default every time you begin scheduling a new job. Also set Adjust clock for daylight saving changes to Yes. That option is equally important.
Set a default Location City and Location State if you want those fields to be pre-populated when scheduling a job.
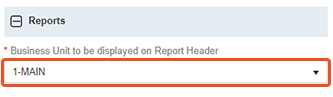
Under Reports, select a default Business Unit to be displayed on Report Header. Each report you print out in RB displays BU information, and the default you set here will be used for each report.
In Notifications and Messages, it is recommended that you set this option to Yes. That way, messages you receive in Notifications and Messages will also be forwarded to your email address, giving you another method of receiving messages.

The last section of User Preferences, Email, is the most important. This is where you set your preferences for emailing out of RB.
When emailing out of RB, you have 2 options for Outgoing Email Method: “Use Personal Setting” or “Use System Preferences.”
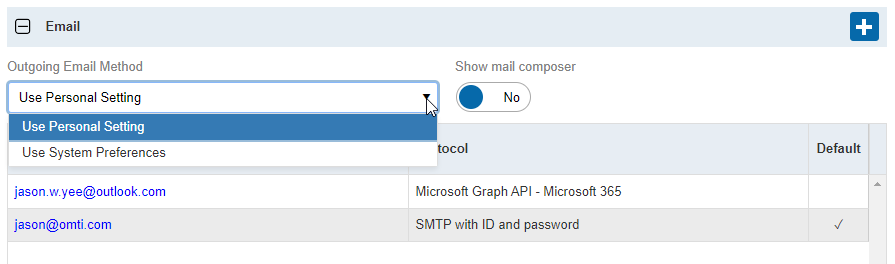
If you will use the company-wide System Preferences, leave the setting as is, and there is nothing further to set up. You can go on to the next step: Importing your clients and resources into RB9.
If you will use your own email account(s), then select “Use Personal Setting.” Click
 to add a new email account. You’ll need to set all the required fields.
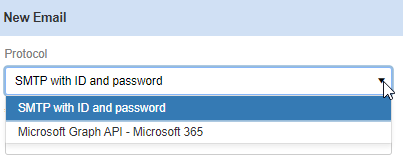
Under Protocol, you have 2 options, SMTP with ID and password and Microsoft Graph API - Microsoft 365.
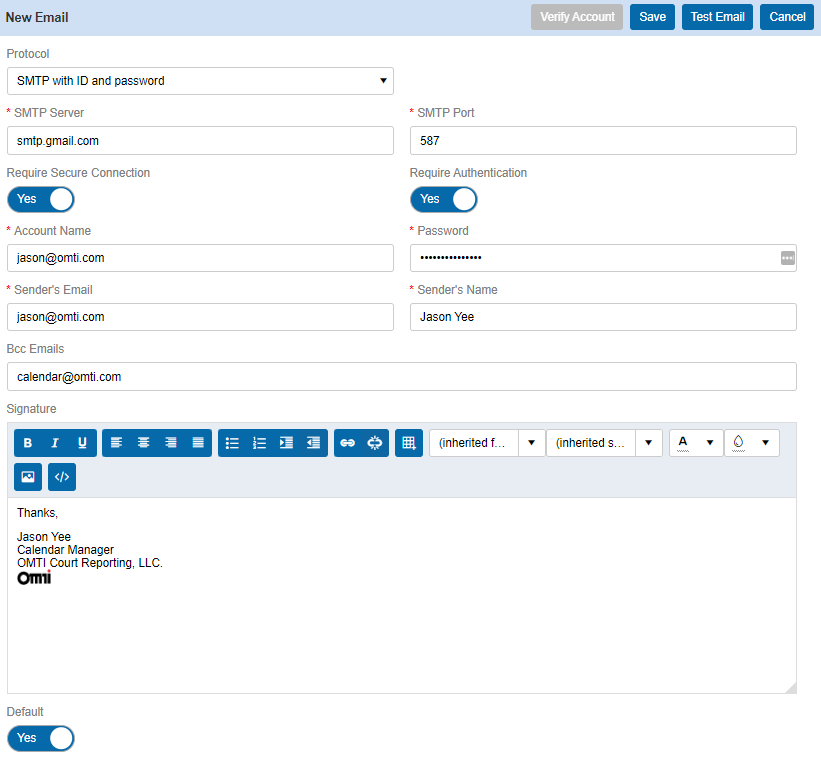
SMTP with ID and password
First, let’s go over setting email using SMTP with ID and password. Using SMTP with ID and Password is a simplified way of being able to email out of RB9. This method simply makes a connection with your outgoing SMTP sever, validates the user and credentials with the email server, and if validated, RB9 will give the email to your outgoing SMTP server and your email server will proceed to send out the email.
Step-by-step instructions
SMTP Server – Outgoing SMTP server name (Contact your email provider to obtain the outgoing SMTP server name.)
SMTP Port – Port used by the outgoing SMTP server (Contact your email provider to obtain the outgoing port.)
Require Secure Connection – Set to Yes for SSL encryption of your email.
Require Authentication – Set to Yes for the added security of SMTP authentication.
Account Name – If Require Authentication is set to Yes, enter the user name for the email address. (This is usually the email account address.)
Password – Password for the above email address.
Sender’s Email – Your email address (Must be a valid email address set up in the email server.)
Bcc Emails – If you would like to bcc specific email addresses every time you send an email from RB9, input those email addresses there, separated by commas.
The Signature section is a nice feature because each user can design their own email signature to give each email a personal touch. If you need directions for how to create a signature, see Customizing email messages & web pages in the RB9 User Guide.
Set Default to Yes if this account should be used by default when sending emails out of RB9. Click Save.
NOTE: Click Test Email at the top right to ensure your email is properly working after inputting the necessary setup.
Microsoft Graph API - Microsoft 365
Now, let’s look at the email setup when using Microsoft Graph API - Microsoft 365 as an option.
The setup for this option is more simplified. You’re simply connecting to the Microsoft Graph API, validating the account, and granting RB9 access to send emails on the email account’s behalf. When you grant that access, a security token is generated by Microsoft allowing RB9 to send emails using that account.
Step-by-step instructions
- Sender’s Email – Microsoft email account address that will be sending the emails from RB9.
- Sender’s Name – Name of user that is tied to the email account.
- Bcc Emails – If you would like to bcc specific email addresses every time you send an email from RB9, input those email addresses there, separated by commas.
- The Signature section is a nice feature here as well, because each user can design their own email signature to give each email a personal touch. If you need directions for how to create a signature, see Customizing email messages & web pages in the RB9 User Guide.
Set Default to Yes if this account should be used by default when sending emails out of RB9.
Below is a sample of the setup, and once you have input all information, click Verify Account at the top.
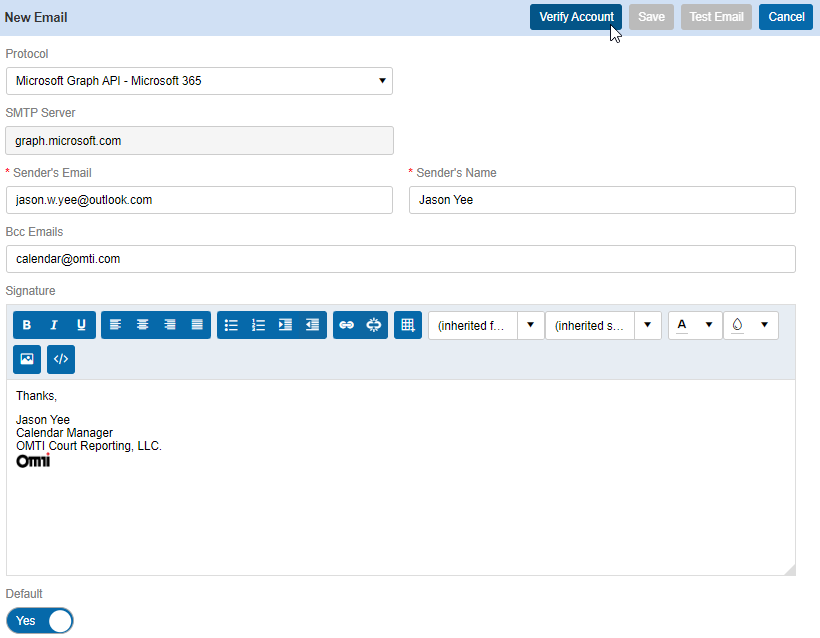
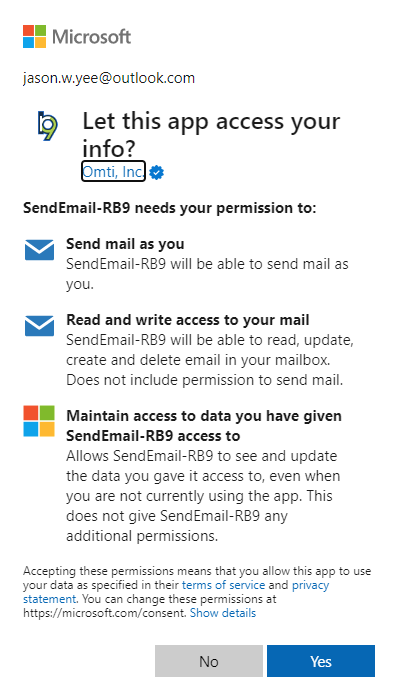
After clicking Verify, you will be asked to allow RB9 to access your Microsoft account information, click Yes.
After verifying the account, you will return to the New Email screen and notice that Verify Account is now grayed out.
NOTE: Click Test Email at the top right to ensure your email is properly working after inputting the necessary setup.
If you have additional email accounts you need to email from, click + and add them by performing the same setup as above.
Finish setting user preferences
Whether you use the SMTP with ID and password option or the Microsoft Graph API - Microsoft 365 option the last steps are the same:
If you have additional email accounts you need to email from, click
and add them by performing the same setup as above.If you like to review your emails before sending them, set Show mail composer to Yes.
When finished setting your user preferences, click Save.