
Setting Connect preferences: Resource–Turn In
If your resources will be turning in their jobs via RB Connect, this section is important. You control what resources can create as new and edit. There’s also a custom section for asking for additional information that is not a part of the standard turn-in.
Step-by-step instructions
- On the left-hand side of the Connect Preferences screen, click Resource–Turn In.
To update preferences displayed, click Edit.
-
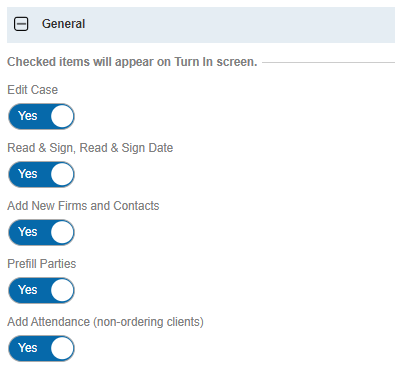
In the General section, set the sliders to Yes for fields you want your resources to see when they turn in jobs via RB Connect. The more options you set to Yes here, the more you’re allowing your resources to fully turn in a job.
Add New Firms and Contacts is an option you may want to disable if you fear resources will create duplicate clients. But note that if this option is disabled, then resources will have to use a notes section or you will have to create a custom section for turning in a copy order. This is because a lot of times, a copy client will not exist in your RB9 system so they will need to be created.
In the Users to notify section, designate who from your team gets notified when resources turn in work. You can set users to be notified when specific tasks are turned in, or they can receive all turn in notifications no matter what task it is.
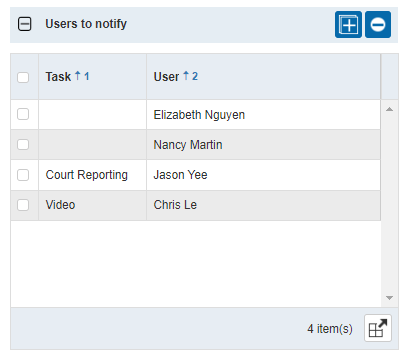
To add staff members to the list, click
 .
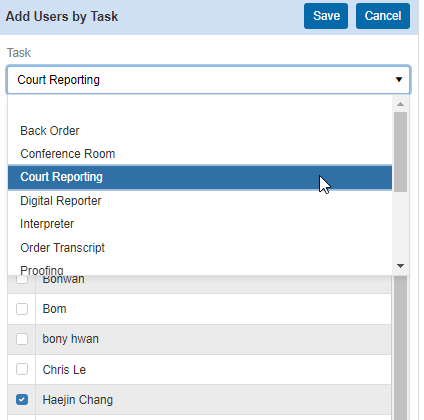
.Then in the Add User by Task panel, select a task from the drop-down list if the user you’re adding to be notified is to only be notified of that task type turned in. If the user is to receive notifications from all tasks turned in, leave this selection blank. Then check the box(es) of staff to be notified and click Save.
To remove someone from the list, check the box next to their name and click
 , then click Yes in the popup.
NOTE: Notifications will be sent in the form of a message to users’ Notifications & Messages inbox in RB9. If your staff wishes to receive carbon copy emails from the system in addition to the RB9 notifications inbox, make sure they have Forward carbon copy set to Yes in their User Preferences.
In the Options section, set Add Exhibit Stamp to Yes, if you wish to allow resources to add exhibit stamps when uploading files during turn-in.
If you want staff members to be notified when a resource creates a new client during turn-in, set the Send a notification when a new firm or contact is created option to Yes.
NOTE: The staff members that are notified when new clients are created pulls from the Users to Notify section in Resource-Turn In. If a user is only to be notified of specific tasks turned in, they will only be notified of clients created when the resource turning in a job is tied to that specific task. If a users’ task is blank, then that user will receive a notification when clients are created, no matter what the task type being turned in, is set to.

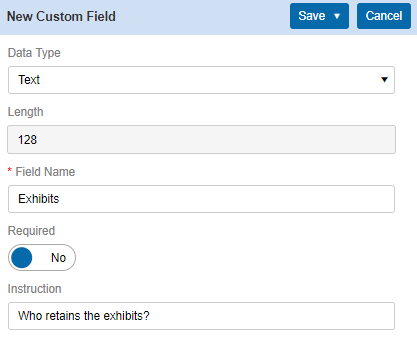
Use Custom Section in Job/Witness to insert custom data fields on the Job Turn-In screen. These can be fields that resources complete to move forward with transcript orders, such as detailed instructions in regards to production, or how quickly they need the transcripts.
Click
 , then in the New Custom Field panel, customize the item you wish to add.
 Set the data type and give your new field a name. Then depending on the type, you can make the item a required entry to turn in a job, set the default for list options, and include instructions for your resources on how to complete the custom field.
Click Save > Save & New to repeat this process for any other custom fields you want to appear in the Job Turn-In screen. Click Save > Save & Close when finished.
Click Save at the top right of the Resource–Turn In panel to save your changes.