
Entering a new job > Additional info
In the last section of the New Job screen, Additional, you can enter some important notes about the job that can be passed along to others receiving communications pertaining to this job.
Step-by-step instructions
-
None of the Additional section fields are required.
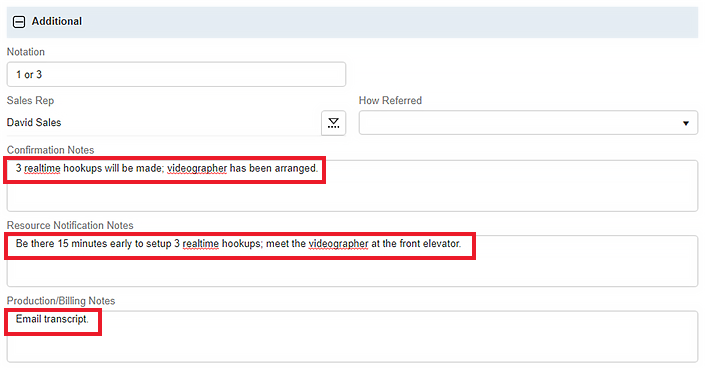
- Notation is a free-text field, 16 characters in length, that appears as one of the columns in the search results in the Jobs (List View) function. Use it for information, like codes for special job requirements, that would be handy to see outside of the job, rather than you having to click to enter the job setup to find that information.
- NEW: If there is a number in Rescheduled From and/or Linked Job, you can click
 to view/ edit the other job.
 - Sales Rep will automatically populate if you have a resource tied to the contact. In the rare instance you need to set the sales rep manually for a job, click
 > Lookup Resource to search for and select a sales rep.
 - How Referred is a marketing tool. Selections here would be how did you receive this job. Additional selections for this drop-down can be managed in the Lists function.
- NEW: Scheduling Notes is where you would save notes about the job that you don’t have to share with the client, resource, or your production/billing staff.
- Confirmation Notes is very important because whatever you type in this field, will appear on the confirmation letter that is sent to your client.
- Resource Notification Notes is an additional note section for the assigned resource. If you have any other information pertaining to the job that you want to pass along to the assigned resource, enter the notes here. These notes will appear on the Assignment Notification letter that you email to the assigned resource.
- Production/Billing Notes will be seen at the time of RB9 turn-in and also on the Production Sheet. Anything important pertaining to Production and Billing for this job that you need to remind your staff about, enter those notes here so they can see them when producing the job.
Once you have all the data input, you can click Save at the top. RB9 will now give this job a job number and a status of “New.”
After you save the job, more sections will appear to allow you to enter more information about this job.
Before you move on to those other sections of the job setup, let’s move on to the next step, which will cover sending out a Job Confirmation.
Entering a new job > Additional info
In the last section of the New Job screen, Additional, you can enter some important notes about the job that can be passed along to others receiving communications pertaining to this job.
Step-by-step instructions
-
None of the Additional section fields are required.
- Notation is a free-text field, 16 characters in length, that appears as one of the columns in the search results in the Jobs (List View) function. Use it for information, like codes for special job requirements, that would be handy to see outside of the job, rather than you having to click to enter the job setup to find that information.
- NEW: If there is a number in Rescheduled From and/or Linked Job, you can click to view/ edit the other job.
- Sales Rep will automatically populate if you have a resource tied to the contact. In the rare instance you need to set the sales rep manually for a job, click > Lookup Resource to search for and select a sales rep.
- How Referred is a marketing tool. Selections here would be how did you receive this job. Additional selections for this drop-down can be managed in the Lists function.
- NEW: Scheduling Notes is where you would save notes about the job that you don’t have to share with the client, resource, or your production/billing staff.
- Confirmation Notes is very important because whatever you type in this field, will appear on the confirmation letter that is sent to your client.
- Resource Notification Notes is an additional note section for the assigned resource. If you have any other information pertaining to the job that you want to pass along to the assigned resource, enter the notes here. These notes will appear on the Assignment Notification letter that you email to the assigned resource.
- Production/Billing Notes will be seen at the time of RB9 turn-in and also on the Production Sheet. Anything important pertaining to Production and Billing for this job that you need to remind your staff about, enter those notes here so they can see them when producing the job.
Once you have all the data input, you can click Save at the top. RB9 will now give this job a job number and a status of “New.”
After you save the job, more sections will appear to allow you to enter more information about this job.
Before you move on to those other sections of the job setup, let’s move on to the next step, which will cover sending out a Job Confirmation.