Entering resources
Resources are people or things that can be assigned to a Task in RB9 to perform a service or provide support. Types of resources include court reporters, videographers, interpreters, transcriptionists, and conference rooms.
NOTE: If you have an existing database of reporters/other resources, we recommend importing them into RB9 using Bulk Import. If you are adding a new resource, use the following procedure.
Step-by-step instructions
To enter resources one at a time, click Entities > Resources.

As you enter resources, you might forget which ones you’ve already entered, so it’s a good idea to pull up all entries in the Resources function before entering a new resource to see if they are already in your database. Enter %%% in the Resource Name search criteria and click
 (Search). (“%%%” is the wildcard to pull up all firms.)
To begin the process of entering a new resource, click New at the top right.
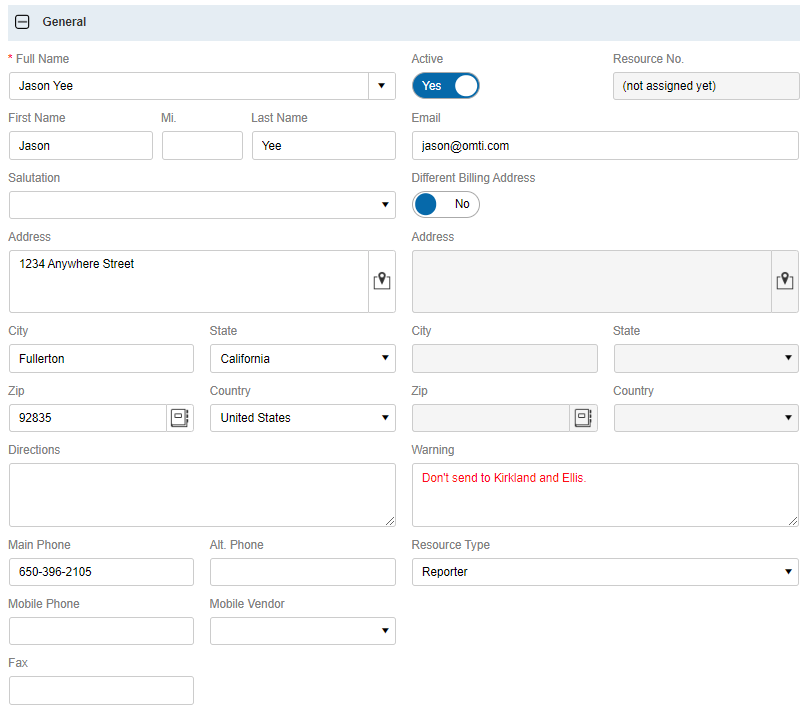
In the General section of the Resource setup, enter basic information, such as First Name, Last Name, Email Address, and Address.
If you plan on sending SMS (text) messages from RB9, make sure you input the resource’s Mobile Phone number and select their Mobile Vendor. Both are required in order for SMS messages to successfully send out.
Notes entered in the Warning field will appear in red text to stand out. Warning notes can be important reminders for you and your staff pertaining to the resource.
Lastly, select a Resource Type. Resource Type can specify profession, e.g., Reporter, Scopist, or Videographer; or other resource, e.g., Conference Room. Resource Type is one of the filters RB9 uses when assigning resources to tasks, so make sure every resource has a type assigned to them.
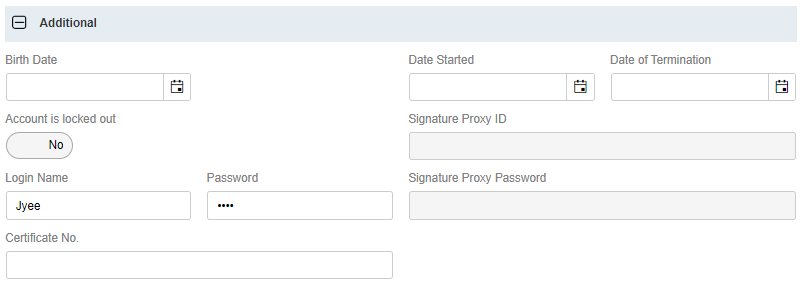
The next section is Additional. If you subscribe to the RB Connect plug-in, enter the resource’s Login Name and Password to set the log-on credentials for this resource. (If you have set your Connect Preferences to Use Email as Login Name, you will not be able to set the Login Name here. Instead, be sure you have an email address entered in the General section above. See Setting Connect preferences: Login.)
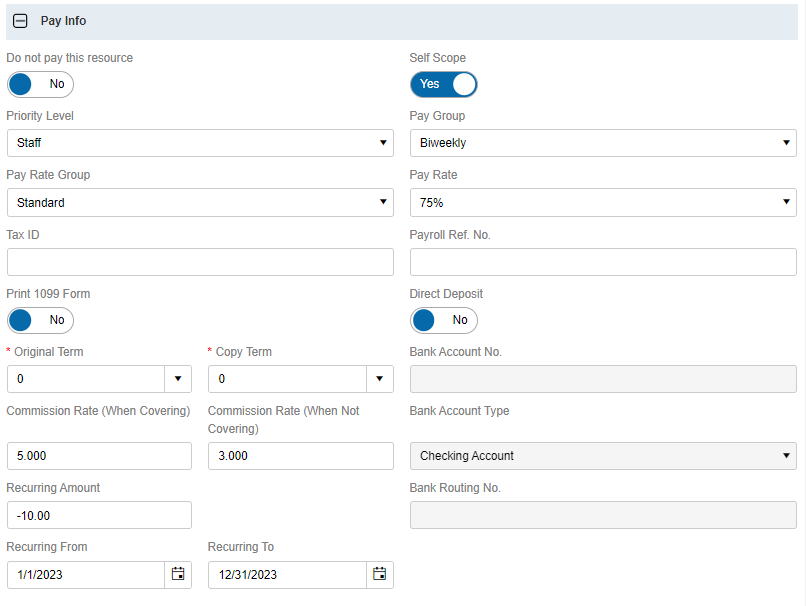
Now let’s talk about the Pay Info section. The most important parts of the Resource setup are in this section.
If you do not want RB9 to generate any pay for this resource, slide the Do not pay this resource option to Yes. If you’re the owner of an agency and still take jobs, this option could be for you if you do not want any pay generated for your account.
Priority Level is an important field because it is one of the filters used when assigning resources to tasks. Set the Priority Level for all resources. “Staff” is a staff resource used regularly, “Affiliate” is an affiliate agency, and “Overflow” is someone you rarely used. (Refer to the RB9 User Guide, Lists > Resources to create your own Priority Level options).
Pay Group refers to the time periods you pay your resources. Most agencies will have all resources set to the same Pay Group because they run one payroll at a time and pay everyone.
TIP: Go to the Lists > Resouces function and set your default Pay Group to what all resources should be set to. That way when you create new resources, they’ll have the default Pay Group automatically set.
If your Resources are always paid at the same pay rate for all the jobs they take, then you can set that rate in the Pay Rate field. Setting the default Pay Rate for a resource will make it so that RB9 will generate that resource’s pay for every job using the same rate.
If you plan on printing 1099-NEC forms from RB9, slide the Print 1099 Form option to Yes.
The next 2 fields, Original Term and Copy Term, are very important. They control how RB9 pays your resources. Original Term refers to how they get paid on original invoices, and Copy Term refers to how they get paid on copy invoices.
A term of 0 (zero) means the resource gets paid on bill out, no waiting. A term of 9999 means the resource gets paid when the agency is paid in full for the invoice.
Those are not your only 2 options. You can set a specific number of wait days. If you make your reporters wait 30 days, you could input 30 in the terms. There is no right or wrong here, it’s however you want to pay your resources. You just need to tell RB9 how to handle each type of invoice, Original and Copy.
Now let’s talk about the Commission Rate options. There’s 2 of them here, both apply to Client Of resources, only one applies to Sales Reps. The fields are percentage fields, so input the full percentage number of commissions they are to receive. If they receive a 7% commission, input 7.
Client Of is a resource who brings in clients. So, if it’s a resource that brings in clients, the resource can cover or not cover jobs from their clients. Commission Rate (When Covering) refers to if the resource is assigned to a job that their client scheduled; this will be their commission rate used for that job. Commission Rate (When Not Covering) refers to when the resource does not cover their client’s job. Even though a different resource is assigned to the job and takes it, this resource will still get some commission for the job because it’s their client’s job.
Sales Reps never cover jobs. They’re account managers, not court reporters that actually get assigned to jobs and take them. So, if you’re setting up the commission percentage for Sales Reps, input the number in the Commission Rate (When Not Covering) field.
Next is Recurring Amounts: Money either added to or subtracted from the resource’s pay between the date range you set in the Recurring From and RecurringTo fields that will affect the resource’s total pay amount. If the recurring amount needs to be a negative, input a – (minus sign) before the amount. Something like, -10. The way it would work is every time you run payroll in between the Recurring From and To dates, RB9 would add a -$10 amount to the final total for the resource (i.e., deduct $10 from the total).
If you plan on exporting an ACH file for direct deposit when running payroll, you must select Yes in all resources’ Direct Deposit option. When doing so, make sure you set the Bank Account No., Bank Account Type, and the Bank Routing No. All of those fields are required.
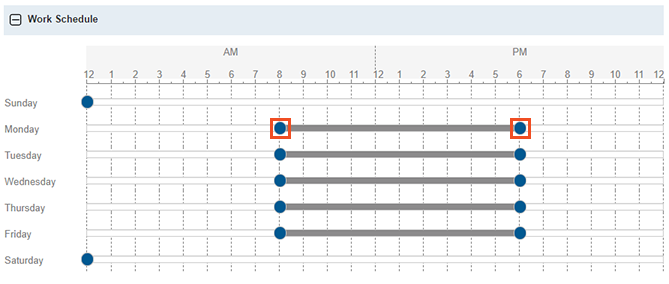
The Work Schedule section is for setting the resource’s standard Sunday through Saturday work time slots. This does not include time-off requested and granted. That will be handled in the Resource Availability function. This is strictly for setting their common work schedule with start time and end times every day.
Once you’re done entering the information, click Save at the top and select Save and Edit.
Now you will be taken to the Notification Email section. Here, RB9 automatically adds 2 Notification Types with the resource’s email address entered in the General section above:
- Job: This is for emailing Assignment Notifications.
- Payroll: This is for emailing the Pay Statement to the resource after payroll is closed.
You can have more than one email for each type if you need to. Click
 to add more addresses. Click a hyperlinked address to change or delete it.
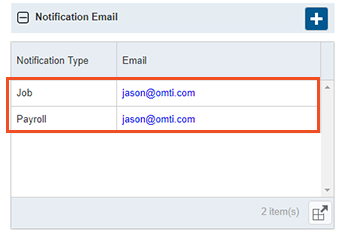
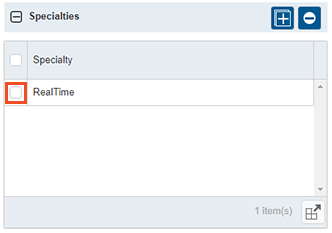
Below the Notification Email section is the Specialties section. Specialties are special skills or traits required to fulfill a job. When setting up resources you can add specialties to their setup, but only add ones that they can fulfill. For example, Realtime is a specialty. Not every resource can fulfill a Realtime job. Add Realtime to all your resources that can take a Realtime job.
Then when you schedule a job that requires a specialty, you add it into the job’s Specialties section. And when you are assigning a resource to that job, RB9 will only show you resources that have that required specialty in their setup as being available. Anyone that cannot fulfill the specialty will not be shown to assign them to the job.
You can create your own specialties in the Lists function (refer to the List section of the RB9 User Guide).
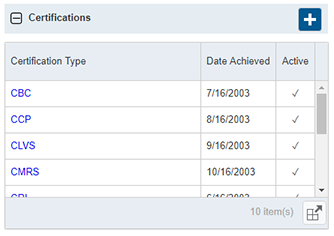
The Certifications section is for keeping up with a resource’s education and skill set. Add all certifications to the resource’s account, so you can see at a quick glance how their continuing education is going. Certification types can be added in the Lists function (Refer to the List section of the RB9 User Guide).
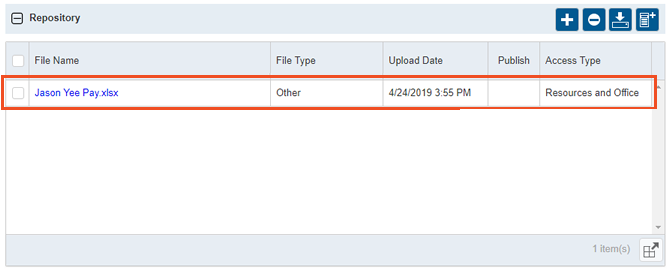
The last section in the Resource setup is the Repository section. Here you can upload documents that pertain to the resource. Maybe you have a negotiated pay rate sheet, and you want to tie that to the resource account. In this section, you can upload that file.