Setting system preferences > General
System Preferences are an essential part of the RB setup process, as they are global settings, which means that they are shared with all of your company’s RB users.
NOTE: To access System Preferences, you must be logged in as an administrator account in RB.
Step-by-step instructions
-
Click Setup > System Preferences.
The first section is General. Expand the section by clicking on the name General to see your list of options.
Click Email.
NOTE: Individual users’ email addresses that they will be using in RB regularly should be set up in User Preferences, because each logged-in user will use their own email account(s) that they email from.
If you only have 1 or 2 email addresses company-wide that you will use to email from RB, then you can set up those accounts here and set one as the default.
Another reason to set up an email account in this section is if you have the RB Connect plug-in to RB9. All RB Connect calendar communications for the contact side of RB Connect will be sent from the email account listed as the default in the System Preferences (you can override this in Connect Preferences > General by selecting a different email address that you set up in System Preferences). Make sure you set up an email account to ensure the auto-confirmations generated by the system are sent out successfully.
Click New, and click the drop-down arrow under Protocol and you will see 2 options for setting up email in RB9.
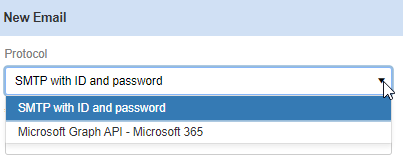
SMTP with ID and password
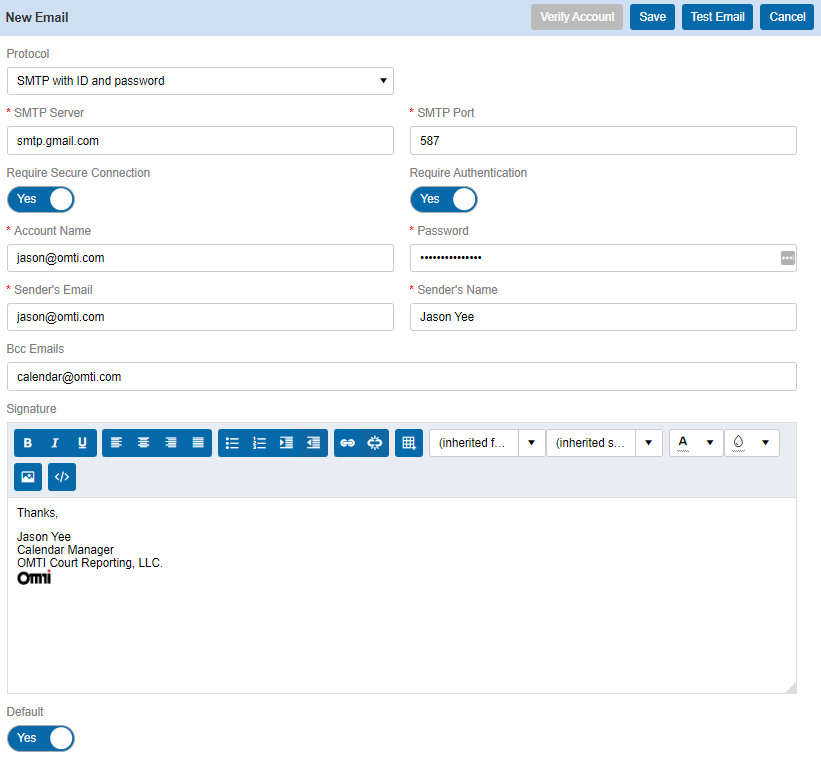
First, let’s go over setting email using SMTP with ID and password. Using SMTP with ID and Password is a simplified way of being able to email out of RB9. This method simply makes a connection with your outgoing SMTP server, validates the user and credentials with the email server, and if validated, RB9 will give the email to your outgoing SMTP server and your email server will proceed to send out the email.
Step-by-step instructions
SMTP Server – Outgoing SMTP server name (Contact your email provider to obtain the outgoing SMTP server name.)
SMTP Port – Port used by the outgoing SMTP server (Contact your email provider to obtain the outgoing port.)
Require Secure Connection – Set to Yes for SSL encryption of your email.
Require Authentication – Set to Yes for the added security of SMTP authentication.
Account Name – If Require Authentication is set to Yes, enter the user name for the email address. (This is usually the email account address.)
Password – Password for the above email address.
Sender’s Email – Your email address (Must be a valid email address set up in the email server.)
Bcc Emails – If you would like to bcc specific email addresses every time you send an email from RB9, input those email addresses there, separated by commas.
The Signature section is a nice feature because each user can design their own email signature to give each email a personal touch. If you need directions for how to create a signature, see Customizing email messages & web pages in the RB9 User Guide.
Set Default to Yes if this account should be used by default when sending emails out of RB9. Click Save.
NOTE: Click Test Email at the top right to ensure your email is properly working after inputting the necessary setup.
Microsoft Graph API - Microsoft 365
Now, let’s look at the email setup when using Microsoft Graph API - Microsoft 365 as an option.
The setup for this option is more simplified. You’re simply connecting to the Microsoft Graph API, validating the account, and granting RB9 access to send emails on the email account’s behalf. When you grant that access, a security token is generated by Microsoft allowing RB9 to send emails using that account.
Step-by-step instructions
- Sender’s Email – Microsoft email account address that will be sending the emails from RB9.
- Sender’s Name – Name of user that is tied to the email account.
- Bcc Emails – If you would like to bcc specific email addresses every time you send an email from RB9, input those email addresses there, separated by commas.
- The Signature section is a nice feature here as well, because each user can design their own email signature to give each email a personal touch. If you need directions for how to create a signature, see Customizing email messages & web pages in the RB9 User Guide.
Set Default to Yes if this account should be used by default when sending emails out of RB9.
Below is a sample of the setup, and once you have input all information, click Verify Account at the top.
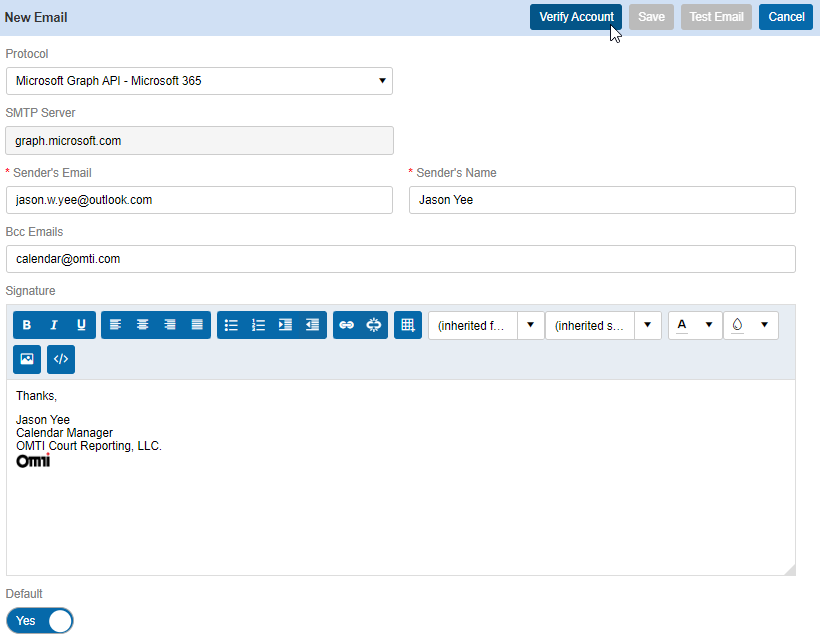
After clicking Verify, you will be asked to allow RB9 to access your Microsoft account information, click Yes.
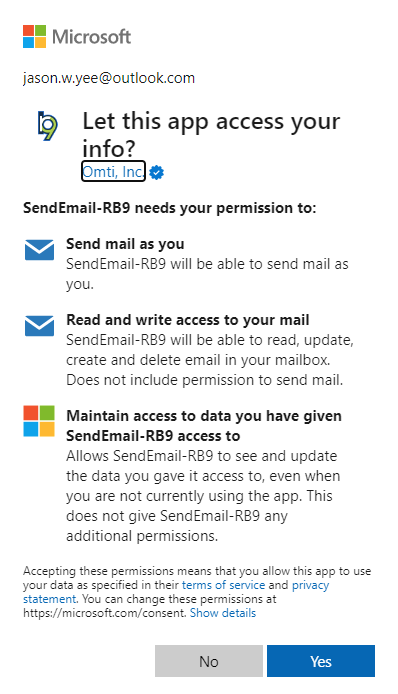
After verifying the account, you will return to the New Email screen and notice that Verify Account is now grayed out.
NOTE: Click Test Email at the top right to ensure your email is properly working after inputting the necessary setup.
If you have additional email accounts you need to email from, click + and add them by performing the same setup as above.
After email setup is complete
Continue with the rest of General System Preferences setup:
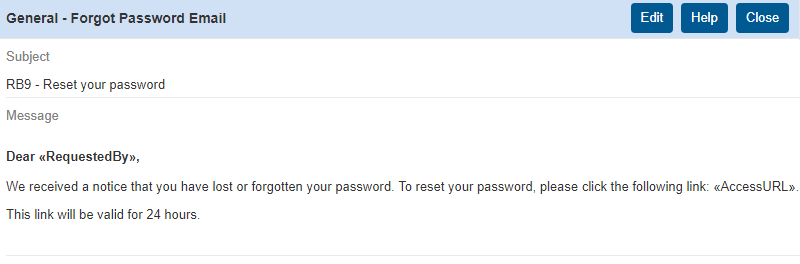
Click Forgot Password Email. If one of your users forgets their RB password, they can click Forgot Password to have an email sent to them so they can reset their password. To customize this email, click Edit. Make your changes, then click Save.
-
Click License Info. This section is for viewing purposes only. It shows important information like your RB URL, total licenses, your current repository usage, and plug-in’s you are subscribed to. All information in this section is uneditable.
Click Login. To set these features that change security in how a user logs in, click Edit.
Account will be locked out, after this number of tries can be set from “Never locked out” to 7 incorrect attempts. A user account will be locked out after incorrectly attempting to log into RB the stated amount of times.
Password must meet complexity requirements, if checked, add another element to setting user account passwords. If this option is set, the password must contain a number, lowercase letter, capital letter, and symbol.
Enforce reset password periodically is an option that forces users to reset their password every once in a while. The every-once-in-a-while (Duration), can be set to every 30, 60, 90 or 180 days. You can Allow the same password as current by checking this option.
Check Use Email as Login Name if you are setting email addresses for all of your user accounts and want to have users sign in with their email addresses instead of custom Login Names.
Check the Use Two-Factor Authentication box to require users to verify their identity upon RB sign-in with a second factor in addition to their user name and password. A verification code will be sent via the user’s preferred method of communication, which they must then enter into RB before accessing the site. Authentication is per device, and users can decide to authenticate a device once or every time they sign in on that device.
If you made any changes, click Save.

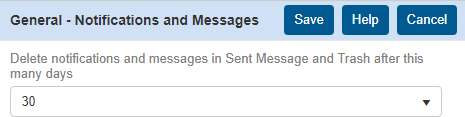
Click Notifications and Messages. This controls how often RB will delete old messages in the Sent Message and Trash folders. Click Edit to change the default. You can select 30, 60, 90 or 180 days in the drop-down. Click Save.
-
Click Session Timeout. With RB being a web-based application, it allows you the liberty and convenience of working from wherever you want, as long as you have a web browser and a decent internet connection. With this, however, comes security issues. Since RB stores sensitive data — particularly data in relation to your Business Units, Accounting, Contacts, and Resources — it will log you off after staying inactive for too long, much like how online banking sites sign you off after a predetermined length of inactive time. This is done to deter any prying eyes from compromising any sensitive data.
The default inactivity time is 20 minutes. You can change that to anything from 5 to 60 minutes in 5 minute increments. To change the default, click Edit. Then select a different time in the Session Timeout Interval (minutes) drop-down. Click Save.
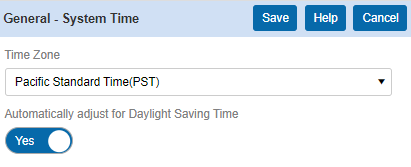
Click System Time. It’s very important that the Time Zone is the one your company is in. To change the default, click Edit. Be sure the Automatically adjust for Daylight Saving Time option is checked. Click Save.